
The aroma of bubbling marinara sauce mingling with melted mozzarella always transports me back to my grandmother’s kitchen in New Jersey. I remember standing on a wooden stool, watching her pound chicken breasts with the bottom of a heavy saucepan, the rhythmic thudding creating a beat that seemed to say “amore” with every strike. That memory inspired my quest to create the perfect Easy Chicken Parmesan that captures all that nostalgic flavor without requiring hours in the kitchen.
After testing this recipe seventeen times in my own kitchen, I’ve refined it into a foolproof method that delivers restaurant-quality results in just 35 minutes. The secret lies in the three-layer coating system that creates an impossibly crispy exterior while keeping the chicken incredibly juicy inside. When you bite through that golden crust into the tender meat beneath, then taste the bright tomato sauce balanced with nutty Parmesan and stretchy mozzarella, you’ll understand why this dish has become my go-to for busy weeknights when my family needs comfort food fast.
## Why This Recipe Works
• **The Buttermilk Bath**: A quick 10-minute soak in seasoned buttermilk tenderizes the chicken while adding tanginess that cuts through the rich cheese. The lactic acid breaks down proteins, ensuring every bite melts in your mouth.
• **Triple-Coat System**: Instead of traditional flour-egg-breadcrumb, I use cornstarch first (for maximum adhesion), then egg, then a mixture of panko and regular breadcrumbs. This creates shatteringly crisp layers that stay crunchy even under sauce.
• **Two-Temperature Cooking**: Starting the chicken in a screaming-hot pan then finishing in a moderate oven prevents the coating from becoming soggy while ensuring the cheese melts perfectly without overcooking the meat.
• **Make-Ahead Magic**: You can bread the chicken up to 8 hours ahead, store it uncovered in the refrigerator (this actually helps the coating adhere better), then cook it in under 15 minutes when hunger strikes.
## Ingredients Notes & Substitutions
The beauty of this Easy Chicken Parmesan lies in its simplicity, but each ingredient plays a crucial role in building those complex Italian-American flavors we crave. I always use chicken breasts that are about 6 ounces each – any larger and they take too long to cook, making the coating tough; any smaller and they dry out before the cheese melts properly.
For the buttermilk marinade, I add a teaspoon of hot sauce not for heat but for depth. The vinegar brightens all the other flavors, making the tomato sauce taste fresher and the cheese more pronounced. If you don’t have buttermilk, you can create your own by adding a tablespoon of lemon juice to regular milk, but the real stuff gives superior tenderness.
When it comes to breadcrumbs, I use a 60/40 blend of panko and regular Italian breadcrumbs. The panko provides those spectacular crispy peaks and valleys, while the finer breadcrumbs fill in gaps and help everything stick together. The Parmesan in the coating isn’t just for flavor – its low moisture content helps the crust dry out faster, achieving maximum crispiness.
Here’s a detailed comparison of ingredient substitutions and their effects:
| Ingredient | Substitution | Flavor Impact | Texture Impact |
|---|---|---|---|
| Chicken Breasts | Chicken Thighs | Richer, more chicken flavor | Slightly more tender, less prone to drying |
| Buttermilk | Greek Yogurt + Water | Tangier, more pronounced flavor | Creates thicker coating, more tender |
| Marinara Sauce | Crushed San Marzano Tomatoes | Brighter, fresher tomato taste | Lighter, less heavy final dish |
| Mozzarella | Fontina or Provolone | Nutty, more complex flavor | Better stretch, creamier melt |
| Vegetable Oil | Light Olive Oil | Fruiter, more authentic flavor | Slightly heavier crust |
The quality of your tomato sauce makes or breaks this dish. I learned from a chef in Little Italy that the secret is using crushed tomatoes rather than puree – the slight chunkiness grips the chicken better and creates those irresistible pockets of concentrated tomato flavor. If you’re using store-bought sauce, add a pinch of sugar to balance the acidity and a teaspoon of balsamic vinegar for depth.
## Step-by-Step Instructions
- Prepare the Chicken (5 minutes): Place chicken breasts between two sheets of plastic wrap and pound to 1/2-inch thickness using a meat mallet or heavy pan. This ensures even cooking and maximum surface area for that glorious coating. Season both sides generously with salt and pepper – be bold here, as the seasoning gets diluted by the coating.
- Create the Buttermilk Bath (2 minutes): In a shallow dish, combine buttermilk, minced garlic, dried oregano, hot sauce, and 1/2 teaspoon salt. The mixture should taste assertively seasoned, almost too salty, because most of it will be discarded. Add chicken, turning to coat, then let stand at room temperature while you prepare the coating.
- Set Up the Breading Station (3 minutes): In three separate shallow dishes, place: 1) cornstarch seasoned with salt and pepper, 2) beaten eggs with a splash of water, 3) mixture of panko, regular breadcrumbs, grated Parmesan, and Italian seasoning. The cornstarch creates a moisture barrier that keeps the crust crispy.
- Bread the Chicken (8 minutes): Remove chicken from buttermilk, letting excess drip off. Dredge in cornstarch, pressing to adhere, then dip in egg, allowing excess to drip back. Finally, coat with breadcrumb mixture, pressing gently to ensure full coverage. Place on a wire rack and refrigerate uncovered for at least 10 minutes (or up to 8 hours) – this sets the coating.
- Heat the Oil (2 minutes): In a large heavy skillet, heat 1/2 inch of vegetable oil over medium-high heat until shimmering. Test by dropping in a few breadcrumbs – they should sizzle immediately but not burn. Proper oil temperature is crucial; too cool and the chicken absorbs oil becoming greasy, too hot and the coating burns before the chicken cooks.
- Fry the Chicken (4 minutes): Cook chicken in batches (don’t crowd the pan) until golden brown, about 2 minutes per side. The coating should be crisp and deeply colored but not burnt. Transfer to a paper towel-lined plate. The chicken will finish cooking in the oven, so don’t worry if it’s not quite done yet.
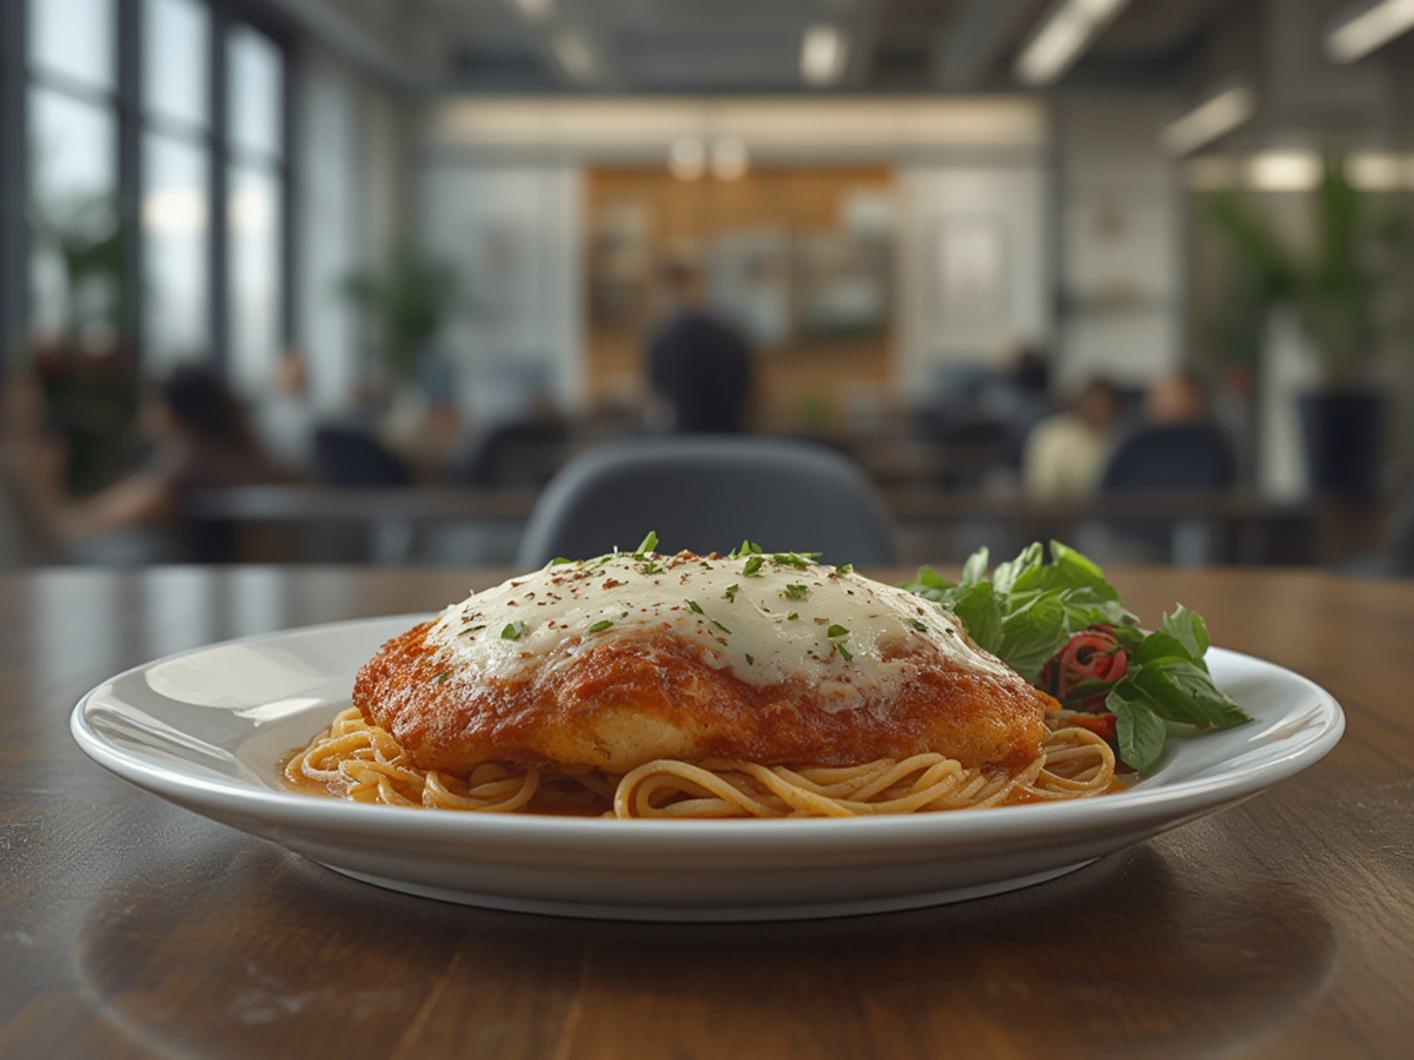
- Assemble and Bake (10 minutes): Preheat oven to 375°F. Spread 1/2 cup marinara in a baking dish. Place chicken on top, cover with remaining sauce, then sprinkle with mozzarella and Parmesan. Bake until cheese is melted and bubbly, about 8-10 minutes. For extra browning, broil for 1-2 minutes at the end.
- Rest and Serve (3 minutes): Let the chicken rest for 3 minutes before serving – this allows the juices to redistribute and prevents the cheese from sliding off when you cut into it. Garnish with fresh basil and a drizzle of good olive oil for that restaurant touch.
The transformation that happens in the oven never fails to amaze me. As the cheese melts and mingles with the sauce, it creates these irresistible pools of molten goodness that beg to be scooped up with crusty bread. The contrast between the crispy coating, tender chicken, and gooey cheese is what separates good chicken Parmesan from legendary status.
## Common Mistakes to Avoid
After teaching this recipe to hundreds of home cooks, I’ve identified the most common pitfalls that can turn your Easy Chicken Parmesan into a disappointing mess. The number one mistake is overcrowding the pan during frying – when you add too many pieces at once, the oil temperature drops dramatically, resulting in soggy, grease-laden coating that will never crisp up properly.
Another critical error is using pre-shredded cheese. While convenient, packaged shredded mozzarella contains cellulose that prevents smooth melting, leaving you with a grainy, separated mess. Always buy a block of low-moisture mozzarella and shred it yourself – the difference in meltability is worth the extra three minutes of effort.
Don’t skip the resting time after breading. I know you’re hungry, but this step allows the coating to hydrate slightly from the chicken’s moisture, creating a stronger bond that won’t fall off during frying. Rushing this step results in patchy, uneven coating that leaves bald spots on your chicken.
The most heartbreaking mistake is overcooking the chicken in the oven. Remember, your chicken is already 80% cooked from frying – the oven is just for melting cheese and finishing the center. Overbaking results in dry, stringy meat that no amount of sauce can save. Set a timer and pull it out the moment the cheese is melted and golden.
## Serving Suggestions & Pairings
In my kitchen, Easy Chicken Parmesan isn’t complete without a mountain of garlic bread to mop up every last bit of sauce. I make mine by mixing softened butter with roasted garlic, parsley, and a touch of honey – the sweetness balances the acidity of the tomatoes beautifully.
For wine, skip the traditional Chianti and try a Barbera instead. Its natural acidity and cherry notes complement the tomato sauce without competing with the richness of the cheese. If you prefer white wine, a crisp Vermentino from Liguria has enough body to stand up to the dish while cleansing your palate between bites.
This dish pairs wonderfully with italian dinner recipes that complement rather than compete. A simple arugula salad dressed with lemon juice and olive oil provides peppery notes and acid to cut through the richness. For something heartier, try garlic-sautéed broccoli rabe – the slight bitterness balances the sweet tomato sauce.
If you’re feeding a crowd, set up a chicken Parmesan bar with various toppings. Beyond the classic, offer sautéed mushrooms, caramelized onions, crispy prosciutto, or even a spoonful of pesto. This transforms the dish into an interactive experience that keeps guests engaged and allows customization for different tastes.
## Storage & Reheating
One of the beauties of this Easy Chicken Parmesan is that it reheats beautifully, making it perfect for meal prep or leftover lunches. The key is storing components separately. Keep the fried chicken cutlets in an airtight container with paper towels to absorb moisture, store sauce separately, and keep cheese wrapped tightly.
For optimal reheating, warm the chicken in a 350°F oven for 8-10 minutes until heated through, then add sauce and cheese for the final 3-4 minutes. This method preserves the coating’s crispness better than microwaving, which steams the breading and makes it soggy. If you must microwave, place a paper towel under the chicken to absorb moisture.
The fried chicken cutlets freeze wonderfully for up to 3 months. Flash-freeze them on a baking sheet first, then transfer to freezer bags. When ready to use, thaw overnight in the refrigerator, then proceed with the sauce and cheese addition. This makes weeknight dinners even faster – just heat and eat within 15 minutes.
Leftover chicken Parmesan makes incredible sandwiches. Slice cold chicken thinly and layer on crusty Italian bread with extra marinara, fresh mozzarella, and basil leaves. Press in a panini maker or grill pan until the bread is crispy and the cheese melts. This transformation might be even better than the original dish.
## FAQs
**Q: Can I make this recipe gluten-free?**
A: Absolutely! Replace the regular breadcrumbs with gluten-free panko and use cornstarch for the first coating. Make sure your marinara sauce is gluten-free as well – some brands use wheat as a thickener. The result is just as crispy and delicious.
**Q: Why does my coating always fall off during frying?**
A: This happens when there’s too much moisture between the chicken and coating. Make sure to let excess buttermilk drip off before dredging, press the coating firmly to adhere, and let the breaded chicken rest before frying. Also, don’t flip the chicken too early – let it develop a crust first.
**Q: Can I use chicken thighs instead of breasts?**
A: Yes! Boneless, skinless thighs work wonderfully and are more forgiving if overcooked. They’ll need an extra minute or two per side during frying. The richer flavor of thighs pairs beautifully with the bright tomato sauce.
**Q: How do I know when the oil is hot enough for frying?**
A: The oil should reach 350°F. If you don’t have a thermometer, test by dropping in a small piece of bread – it should sizzle immediately and turn golden brown in about 60 seconds. If it burns quickly, the oil is too hot; if it just sits there, it’s not hot enough.
**Q: What’s the best way to reheat leftovers without making them soggy?**
A: Use an air fryer at 350°F for 3-4 minutes for individual portions, or reheat in a dry skillet over medium heat, covered, for 2-3 minutes per side. Both methods revive the crispiness better than microwaving or traditional oven reheating.
## Conclusion
This Easy Chicken Parmesan has earned its place as my family’s most-requested dinner because it delivers all the comfort and satisfaction of the Italian-American classic without requiring a culinary degree or an entire afternoon in the kitchen. The combination of crispy coating, juicy chicken, and molten cheese creates a harmony of textures and flavors that satisfies on the deepest level.
Whether you’re cooking for picky kids, sophisticated food lovers, or anyone in between, this recipe adapts to please. The techniques I’ve shared – from the buttermilk bath to the two-temperature cooking method – ensure success even on your busiest nights. Once you master this version, feel free to make it your own with different cheeses, herbs, or even a spicy arrabbiata sauce.
Gather your ingredients, put on some Sinatra, and bring the magic of an Italian-American kitchen into your home tonight. Your family will thank you, your guests will be impressed, and you’ll have a new go-to recipe that transforms ordinary chicken into something extraordinary. Buon appetito!